Zacc's documentation
Expenses
Learn how to create/manage/remove expenses
Creating expenses
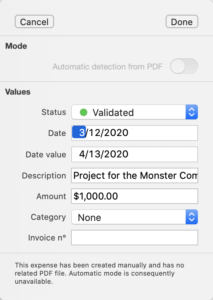
Create expenses manually (= without a PDF document)
- Go to the Expenses view
- Click on the “+” button at the bottom left of the screen
- Select “Add expense manually…”
- Fill-in the fields
- Click on “Done” to save the modifications
Create expenses automatically = (from PDF document(s))
- Go to the Expenses view
- Click on the “+” button at the bottom left of the screen
- Select “Add expense from PDF…”
- Select the document(s)
- Expenses are automatically created (assuming you already configured the Models for these documents)
OR
- Go to the Expenses view
- Drop PDF documents in the view
- Expenses are automatically created (assuming you already configured the Models for these documents)
Modifying expenses
Modify an expense
- Go to the Expenses view
- Double-click on the expense to modify OR right-click on the expense and choose “Modify…”
- Change the desired values
- Press the Done button on the top-right of the popover window
Note: If the values have been filled automatically by Zacc from a document, you might need to deactivate the “Automatic mode” on that Expense to modify certain values.
Removing expenses
Removing expense(s)
- Go to the expenses view
- Select and right-click on the expense(s) to remove
- Choose “Delete…”
- Press “OK” when asked if you are certain
OR
- Go to the expenses view
- Select the expense(s) to remove
- Press the Backspace key on your keyboard
- Press “OK” when asked if you are certain